The camera properties display is where the application displays camera properties and where the user can change them.
The camera properties are grouped into categories and they depend on connected DSLR camera vendor and model.
In the upcoming part I will try to describe the properties using a Nikon D7100
Camera category

This category contains buttons that change the connected DSLR camera mode and the application mode
- Camera driving mode – with this button the user can change the camera driving mode (single shoot, continuous shooting, etc) If the button is disabled check the camera mode property under 4
- Remote control mode – with this button the user can change the remote control mode (off, quick response, 2s delay, etc)
- Exposure mode – with this button the user can change the camera exposure mode (M,A,P, S, etc)
- Camera mode button – this is a Nikon only property.
‘camera mode’ – initially the camera is in ‘camera mode’ In this mode the user can change the camera settings using the camera dials/button and can initiate a capture with the camera capture button. While the camera is in this mode the application can’t change the camera properties that have dials on camera (exposure mode, focus mode, etc)
‘host mode’ – in ‘host mode’ the application takes full control over the camera and the user can change all the properties from the application. While the camera is in ‘host mode’ the camera dials/buttons and the camera capture button are disabled. - Live view button – with this button the user can start/stop the camera live view (the button will be visible only if the camera supports live view while the camera is connected with USB)
- Capture history button – with this button the user can show/hide the capture history display.
- Image gallery button – whit this button the user can show the image gallery
- LrTimelapse button – with this button the user can show the LrTimelapse screen
- Connection/settings screen button – with this button the user can show the connection/settings screen
Exposure category

This category contains the buttons for properties that are related to camera exposure settings. Pressing these buttons the user can change the camera exposure settings
- Shutter speed – the camera current shutter speed
- Aperture – the camera current aperture value
- ISO – the camera current ISO value
- Exposure corrention – the camera current exposure correction value
- Auto ISO button – this is Nikon only. With this button the user can enable/disable the camera auto ISO control
- Exposure EV step – with this button the user can change the camera exposure EV step
- ISO EV step – with this button the user can change the camera ISO EV step
- Exposure delay – with this button the user can change the camera exposure delay
Focus & metering category
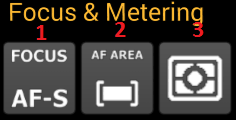
This category contains button for camera properties related to focus and metering settings.
- Focus mode – pressing this button the user can change the camera focus mode.
Note: ‘MF fixed’ means the auto focus is disabled on the attached objective or the objective does not support auto focus.
Note: for Nikon users if the camera has a dedicated focus button this property can only be changed from application if the camera is in ‘host mode’ - AF area mode – with this button the user can change the camera AF area mode
- Metering mode – with this button the user can change the camera metering mode
Image category
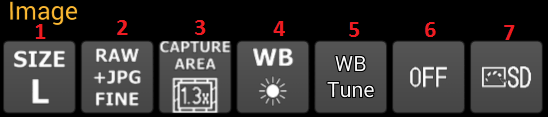
The image category contains buttons for camera properties that change the camera image settings (size, format, etc)
- Image size – using this button the user can changethe camera image size for JPG files (small, medium, large)
- Image format – using this button the user can change the camera image format and compression (RAW, JPG, RAW+JPG, etc)
- Capture area – using this button the user can change the camera capture area
- White balance – using this button the user can change the camera white balance
- White balance fine tune – using this button the user can fine tune the camera white balance settings
- Active D-lighting – using this button the user can change the camera Active D-Lighting settings
- Active picture control – using this button the user can change the camera Active picture control settings
Custom bracketing category
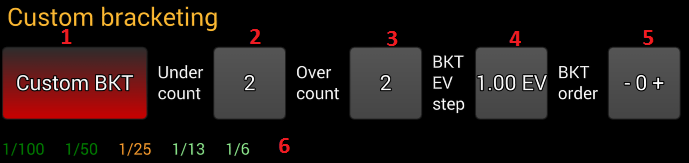
The custom bracketing category contains button for setting up custom bracketing
- Custom bracketing toggle button – with this button the user can enable/disable the custom bracketing
- Under exposure count – with this button the user can change the number of under exposure images that will be captured
- Over exposure count – with this button the user can change the number of over exposure images that will be captured
- Exposure step – with this button the user can change the exposure step between the captured images
- Capture direction – with this button the user can change the order of the custom bracketing capture
- Custom bracketing overview – here the user can see what shutter speed or exposure correction will use the application.
Camera built in bracketing and HDR category
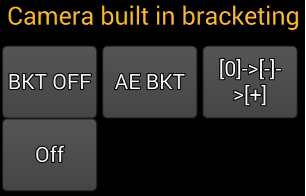
The camera built in bracketing category contains button for controlling the camera built in bracketing and HDR mode
Flash category
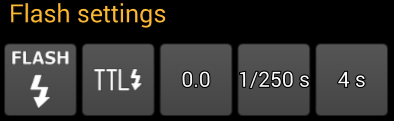
This category contains the buttons for changing the camera flash settings (internal/external)
Note: this category will contain the buttons for the Nikon CLS settings if the camera supports it. Unfortunately Nikon choose not to include the PTP properties for Nikon CLS on every camera even if the camera has Nikon CLS (the D7100 has CLS but it does not have PTP properties for it – hope maybe they will change this with a firmware update)
Note: this category will contain buttons related to Canon flash control. This is still work in progress
Live view category

This category contains button for changing various live view settings while the live view is enabled. This category is only visible if the camera live view is enabled
- Live view mode – with this button the user can change the live view mode (movie recording mode, photography live view)
- Live view AF area mode – with this button the user can change the live view AF area mode
- Live view focus mode – with this button the user can change the live view focus mode
- Live view zoom – with this button the user can change the live view zoom ratio
- Live view histogram – with this button the user can change the live view histogram mode display (no histogram, separate histogram, combined histogram)
- Live view aspect ratio – with this button the user can change between the various aspect ratio overlays (4:3, 3:2, 16:10, etc)
- Live view grid mode – with this button the user can show/hide the live view grid
- Live view filters – with this button the user can switch to live view filters display
- Live view focus stacking – with this button the user can switch to live view focus stacking
Movie category

The movie category contains buttons for setting the camera movie recording properties
- Movie recording quality – with this button the user can change the movie recording quality
- Move recording resolution – with this button the user can change the movie recording resolution
- Movie recording audio mode – with this button the user can change the movie recording audio recording mode
- Movie recording audio level – with this button the user can change the movie recording audio level
- Movie recording shutter speed – with this button the user can change the shutter speed that will be used during movie recording
- Movie recording aperture – the aperture that is used during movie recording
- Movie recording ISO – with this button the user can change the ISO speed that will be used during movie recording
- Movie recording exposure correction – with this button the user can change the exposure correction that will be used during movie recording