There is a test version for Windows and Linux for the new Interval Controller and the NMX Controller integeration.
More info here: Interval Controller & NMX Controller test version
If you have suggestion/error report please do it in forum.
There is a test version for Windows and Linux for the new Interval Controller and the NMX Controller integeration.
More info here: Interval Controller & NMX Controller test version
If you have suggestion/error report please do it in forum.
Did some more work on the NMX Controller and got the programming part also working. Hope till end of week I can build a test version for the desktop platforms.
Here is the new NMX Controller screen:
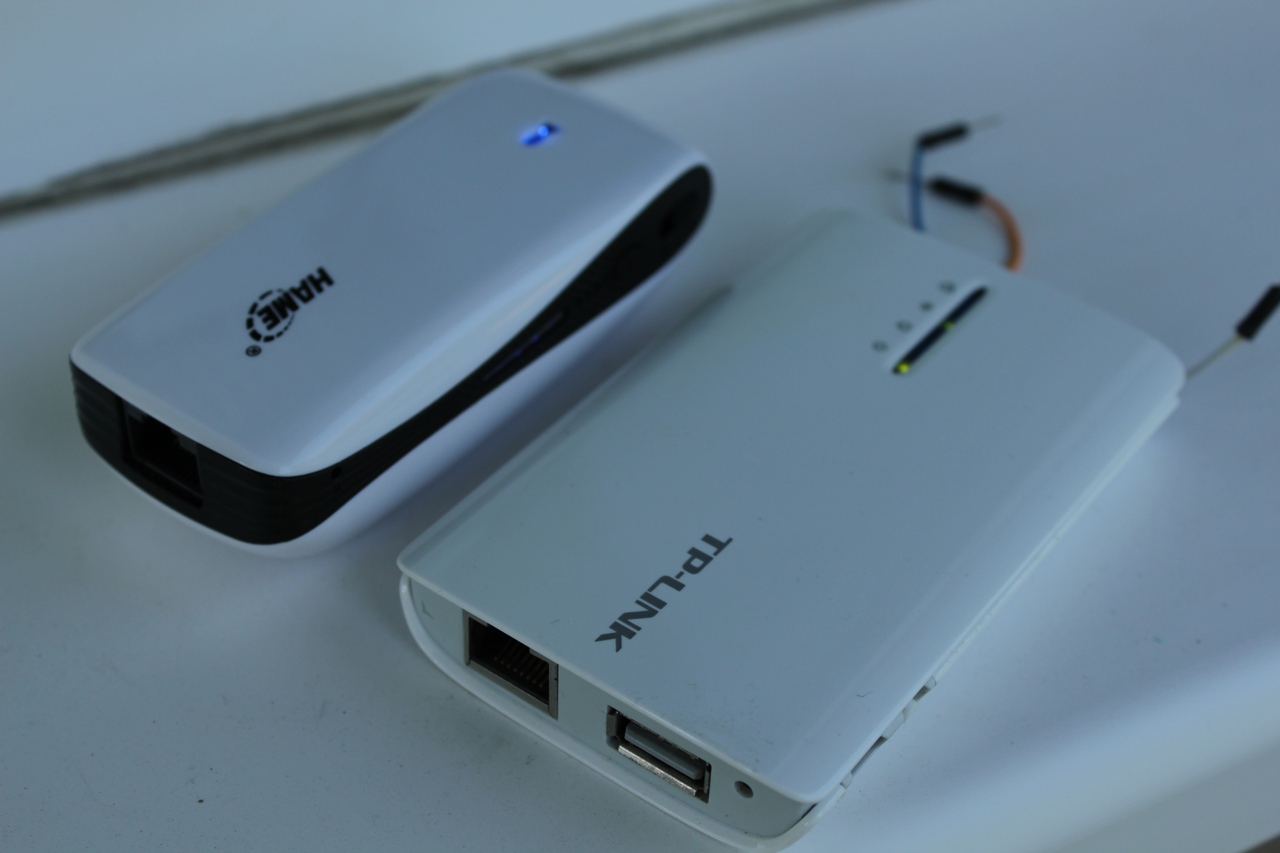
A user pointed me to the HAME MPR-A2 portable wireless router and after checking that OpenWrt works on it I ordered one from here:
http://www.dx.com/p/hame-mpr-a2-3g-150mbps-wireless-router-5200mah-portable-charger-black-197321#.VVnzfvlsFBc
After around 1 month it finally arrived.
The OpenWrt images (with ddserver) are here:
You need both images, first the ‘uImage’ is flashed using the original HAME administration interface and after that using the OpenWrt administration interface the ‘sysupgrade’ image is flashed.
I wrote a small flashing instructions : HAME MPR-A2 flashing instructions
Here is an image compared to TP-Link MR3040 (V1)
Uploaded V0.2.9 for all platform and also will submit for review for iOS devices
Changelog:
– fox for crash introduced in V0.2.7 that hit some of the Canon DSLR
– added D7200 (property values included)
– added new live view and image renderer
– added option to connect to all discovered DSLR (USB, ddserver)
– added option to sync DSLR date/time on connection start
– added live view ghost image with a dialog for JPG selection
– added image sharing for mobile platforms (Android, iOS) in gallery and image viewer
– fixed error in LRTimelapse that prevented ‘sunrise’ to work with ‘Auto direction’ enabled
– moved to LibRaw V0.17 Alpha4 (D3300 NEF files work now)
– added delay for focus stacking
– added delay for sky stacking
– fixed Unicode image folder on Windows
– other small fixes that where reported
Version V0.2.8 is skipped so that all platforms have the same version.
The Interval Controller (IC) is an advanced interval timer that can control multiple channels.
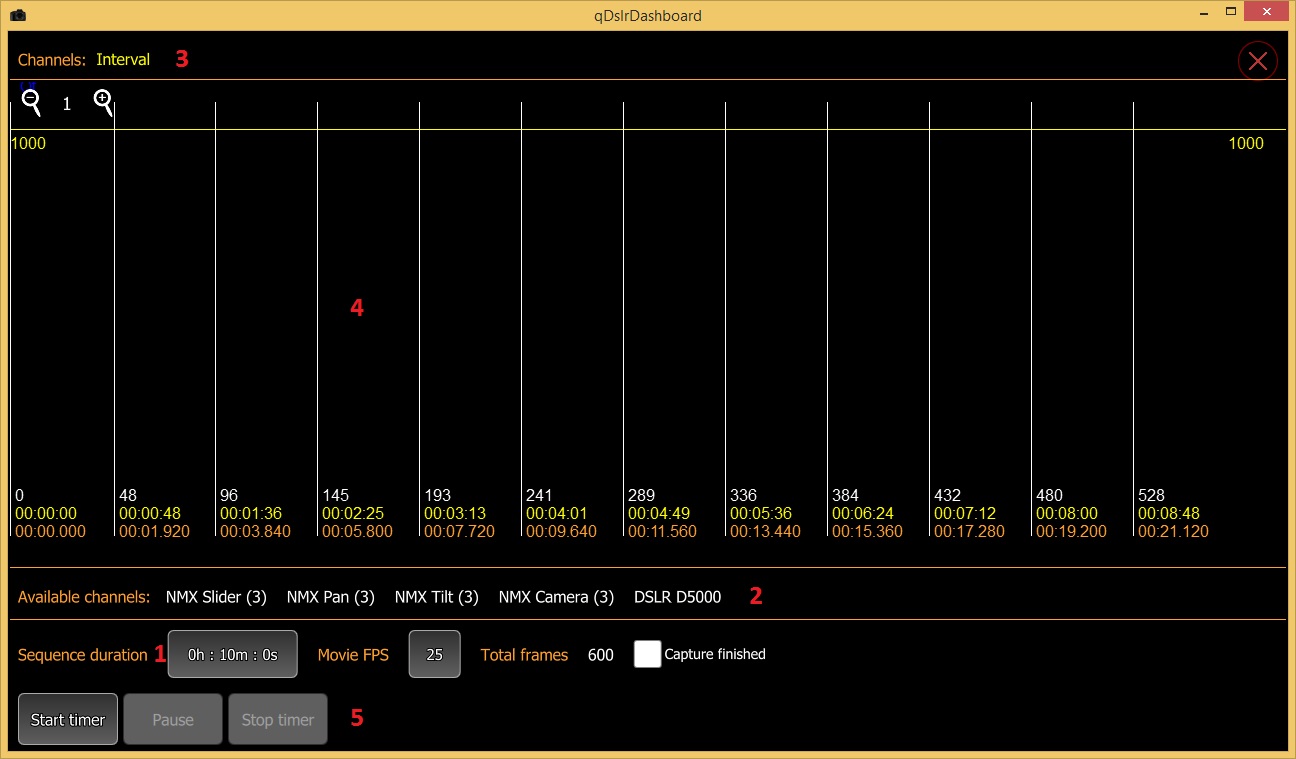
After entering the IC screen the user should set the ‘Sequence duration’ (1). Under ‘Total frames’ the user can see how many captures are required to get the selected sequence duration with the current interval.
Under ‘Available channels’ (2) there is a list of channels that can be used with this interval controller, in my case these are the channels for the connected NMX Controller on address 3 ( NMX Slider, NMX Pan, NMX Tilt, NMX Camera) and the connected Nikon D5000 (DSLR D5000).
There are currently 4 types of channels:
The user can add the channel to the interval controller graph (4) by simply dragging the channel name to the interval controller graph (4) and dropping there. After the channel is added to the interval controller graph it name will be listed under ‘Channels’ (3)
By clicking on the registered channel name (3) the user can change the channel parameters if it supports it. The following channel parameters are currently available:
Channels also support operators that will change the channel value over defined time with an applied easing. Currently the ‘Interval’ and ‘NMX Motor’ channels support operator. Operators can be added by dragging the channel from the channels list (3) to the interval graph area (4). After the channel is dropped the operator dialog will be shown where the operator parameters can be changed(duration, easing, end value).
It is hard to describe all the functions so here is a small video demonstrating the NMX Controller integration and the new Interval Controller
Dynamic Perception sent me an NMX Digital Motion Controller so that I can integrate it into qDslrDashboard. I would like to thank them here again for sending me it and for making such a great product.
The NMX Controller allows controlling over the USB serial or Bluetooth Low Energy ports using the MoCoBus protocol.
In qDslrDashboard both communications will be supported, the USB serial will work on desktop versions (Linux, OSX and Windows) and the Bluetooth Low Energy will work on mobile platforms (Android, iOS and Linux)
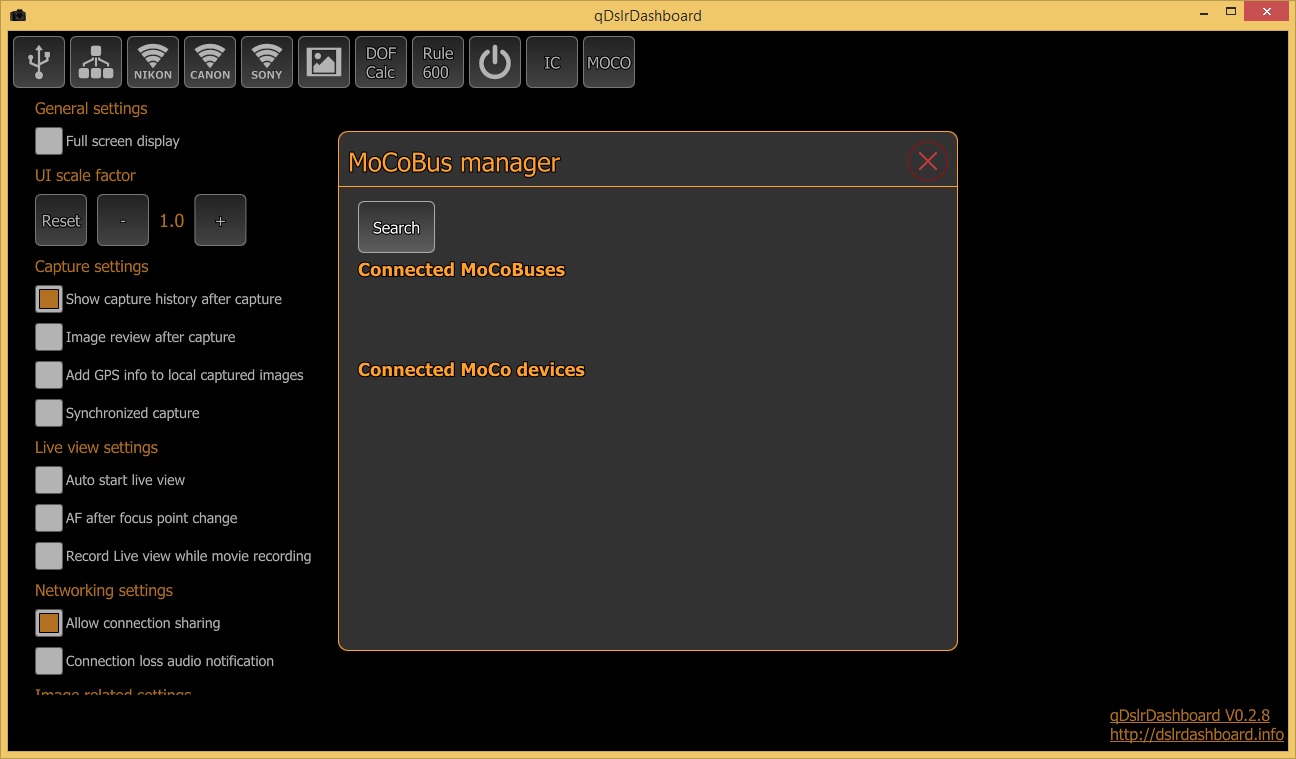
In qDslrDashboard the MoCoBus manager will be used to detect and connect to devices that support the MoCoBus protocol. Here is a screenshot of the manager dialog.
Pressing the ‘Search’ button will display the detected serial ports and Bluetooth Low Energy devices as shown on the following screenshot
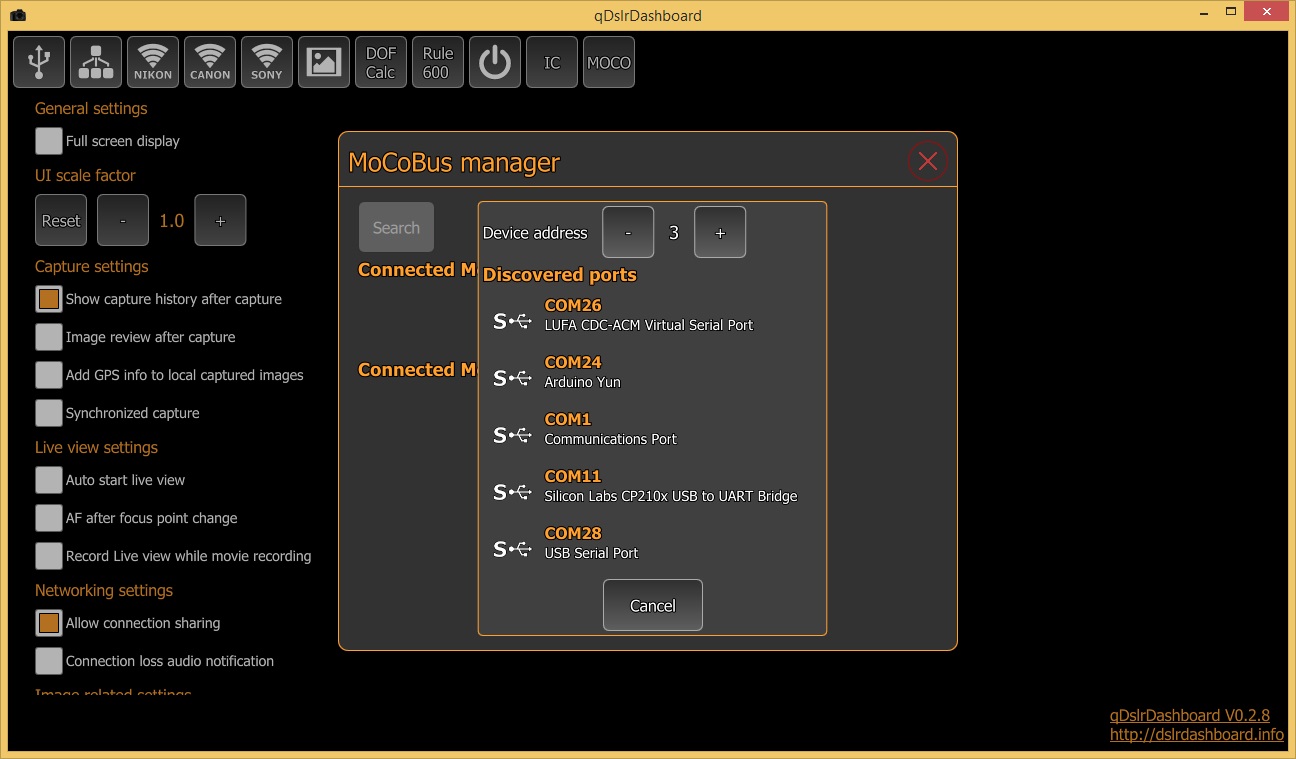
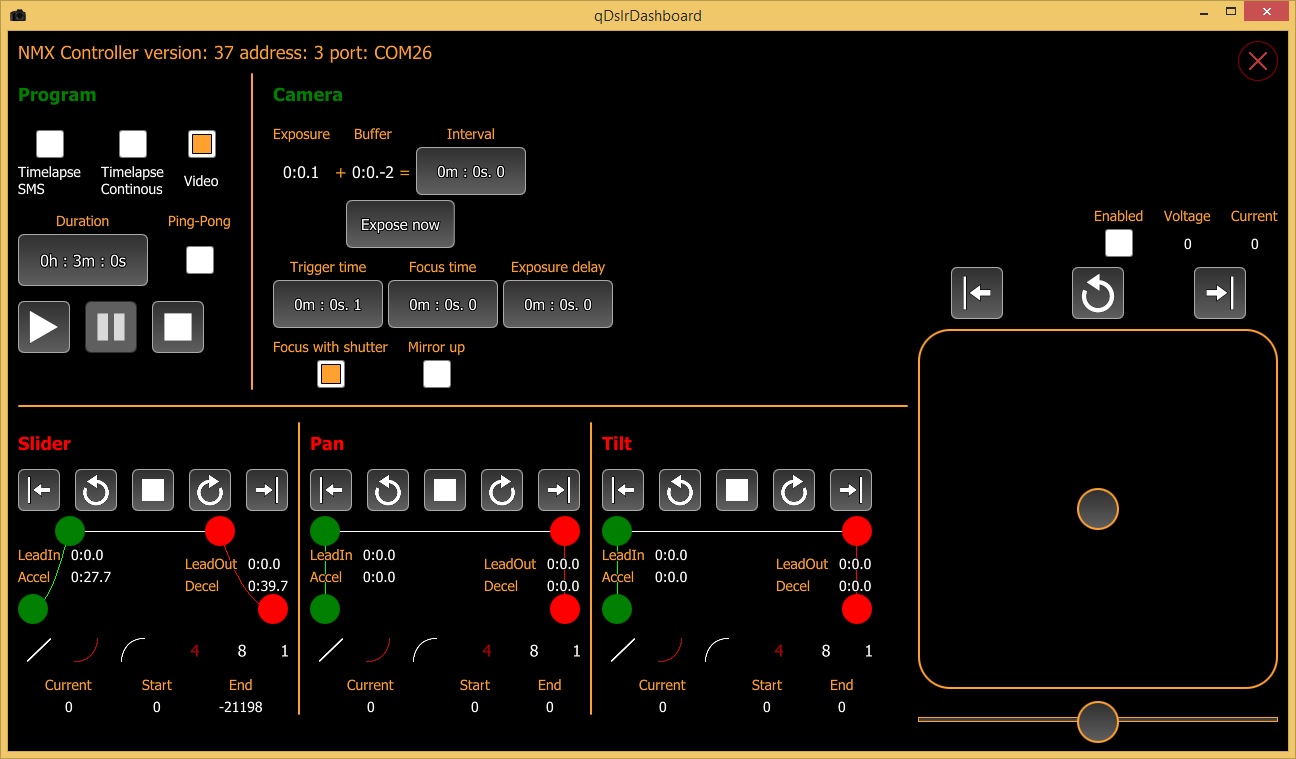
In my case the NMX Controller is on COM26 on my Windows machine. With the device address the user can select the MoCo device address for connection, by default the NMX Controller address is 3. The connection with the device is established by clicking on the item.
After I clicked on COM26 qDD will establish the connection with the NMX Controller as show in the next screenshot
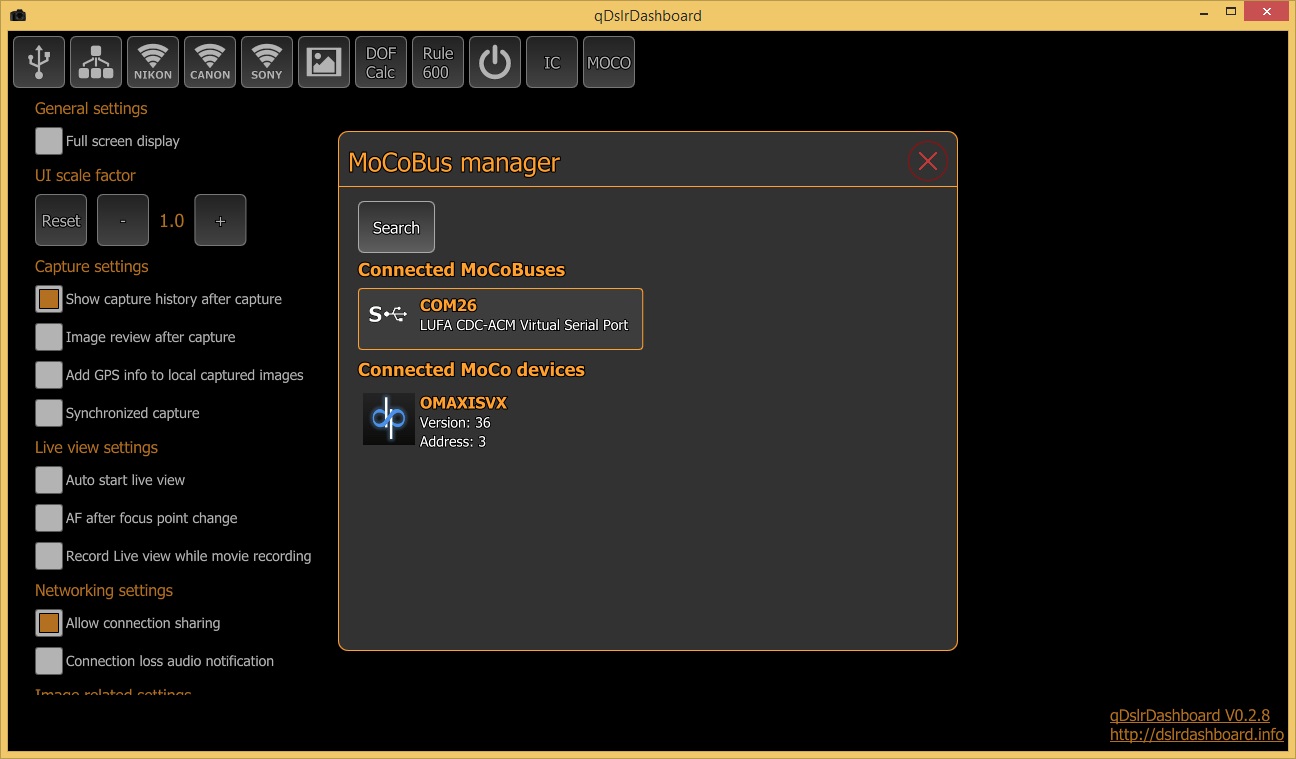
Under the ‘Connected MoCoBuses’ are listed the currently connected ports and by clicking on the item the manager will show the MoCo devices that are connected to this bus.
Under the ‘Connected MoCo devices’ are listed the MoCo devices that are connected to the selected MoCoBus port, in my case the Dynamic Perception NMX Controller.
After clicking on the MoCo device item qDD will open the NMX Controller screen;
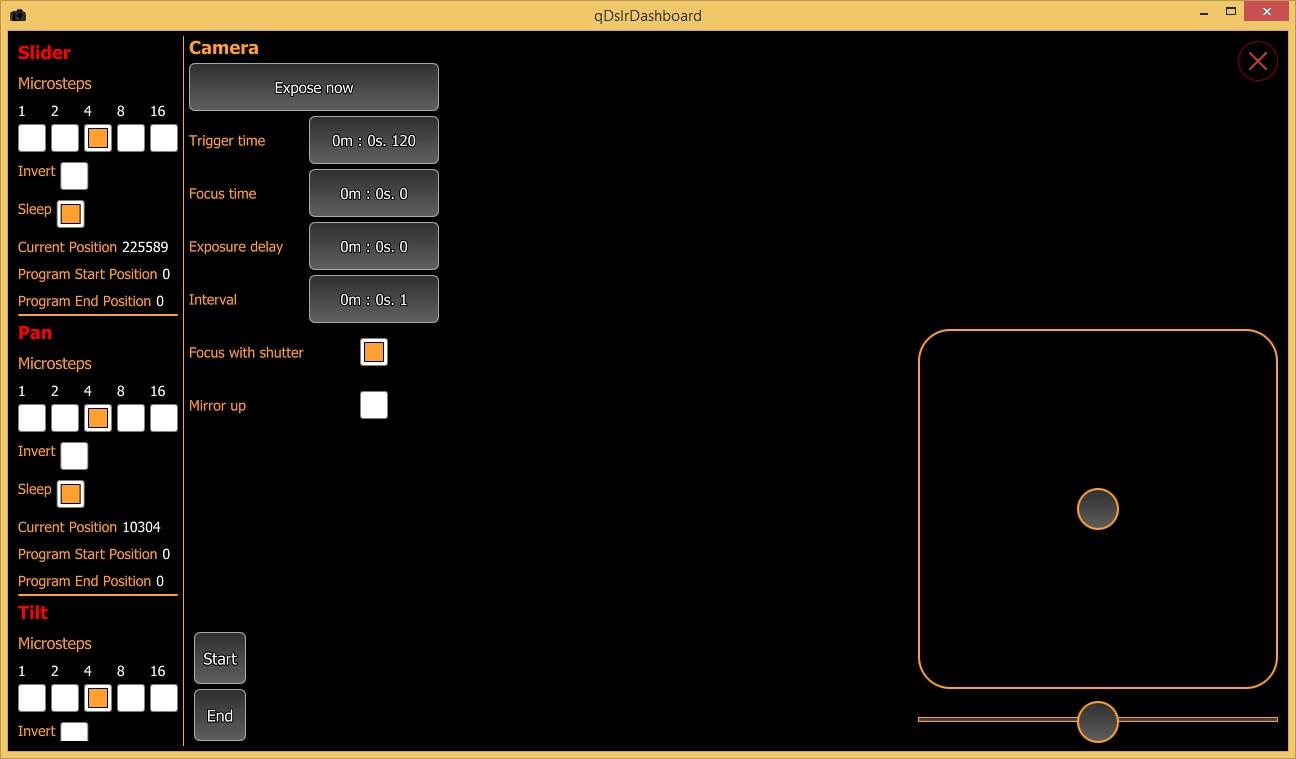
The NMX Controller screen is still under development. Till now I implemented the joystick mode where the motors connected to NMX Controller can be moved with the controls on the right side of the screen, the motor parameters can be changed and the camera parameters. Still need to implement the programming part.
Still lot of work ahead but I’m very happy with the progress I made till now.