With the help of LRTimelapse screen in qDslrDashboard you can monitor your time-lapse session and eventually make some changes to camera exposure settings if needed. It was made with help of Gunther Wegner the developer of the LRTimelapse application.
By monitoring the histogram when shooting Sunsets/Sunrises and changing Exposure/ISO accordingly from time to time as it gets darker or brighter you will be able to capture time lapses with a huge dynamic range without the need to use HDR, bulp ramping or other complicated and inferior techniques. DSLR Dashboard helps you to make all those adjustments without touching the camera and lets you do all you need to via this one, streamlined screen. You will then use the Software LRTimelapse to easily compensate for that adjustments by intelligently tweaking the Metadata of the images and using Lightroom or Adobe Camera RAW and LRTimelapse to render a smooth time lapse transition from day to night without any visible jumps. Please find all information about LRTimelapse and the so called “Holy Grail Method” of time lapse shooting including video tutorials and a free test version on LRTimelapse.
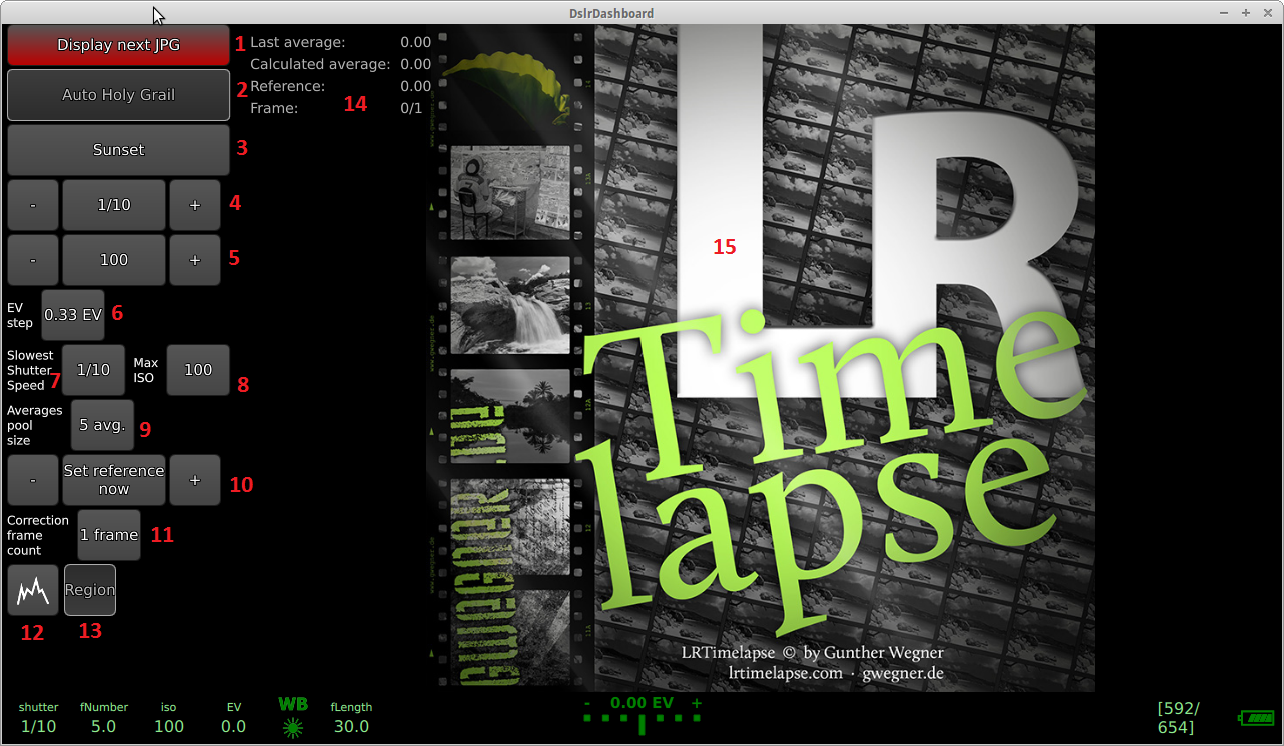
Parts of the LrTimelapse screen:
- Display next JPG – with the help of this button the user can instruct the application to download/display/analyse the JPG image from camera after a capture is made. If the ‘display next JPG’ option is enabled the button will have a red color.
After the image is downloaded and displayed the application will turn off the ‘display next JPG’ option - Auto holy grail – with this button the user can enable/disable the ‘auto holy grail’ function. While enabled the application will download and analyse the JPG image histogram after a capture was made and according the settings correct the camera shutter speed/ISO
- Auto holy grail direction mode– with this button the user can select the auto holy grail direction mode. (sunset, sunrise)
- Shutter speed – here the current camera shutter speed is displayed. The user can change the shutter speed with the -/+ buttons. The shutter speed will be increased/decreased by the selected EV step value (6)
- ISO speed – here the current camera ISO is displayed. The user can change the ISO with the -/+ buttons. The ISO will be increased/decreased by the selected EV step value (6)
- EV step – the EV step value that will be used when the user press the shutter speed -/+ or ISO -/+ buttons
- Slowest shutter speed – with this button the user can select the slowest shutter speed value for the ‘auto holy grail’. After the slowest shutter speed is reached the application will start increasing the ISO
- Max ISO – with this button the user can select the maximum ISO value that application can use while the ‘auto holy grail’ is enabled
- Averages pool size – with this button the user can select the pool size for the ‘calculated average’ calculation. The application will calculate the ‘calculated average’ from the selected number of last ‘average’ values
- Reference point – with the ‘set reference now’ button the user can the ‘reference’ value to the current ‘average’. With the -/+ buttons the user can decrease/increase the current ‘reference’ value by 10%
- Correction frame count – with this button the user can select how often will the application download and analyse the captured JPG. 1 frame means the application will download and analyse every JPG after capture, 5 frame means that 5 captures must past before the application downloads and analyses the JPG after the capture.
Note: if there is a shutter or ISO change is pending the application will wait until the properties values are changed and the changes are propagated to captured image - Histogram mode – with this button the user can change the histogram mode for the displayed image. The available histogram modes are: no histogram, separate histogram, combined histogram
- Region selection – with this button the user can select a region of the captured image that will be used for ‘average’ value calculation.
- Information display – this is the area where the current values are displayed that are used by ‘auto holy grail’
- average – the application calculates this value by analyzing the downloaded JPG histogram
- calculated average – this value is calculated according the pool size option (9). The selected number of last ‘averages’ are used to calculate the value
- reference point – this is the value that the ‘auto holy grail’ uses to determine if it needs to change the shutter speed or ISO.
When used with ‘sunset’ option (3) if the ‘calculated average’ is smaller then the ‘reference point’ the application will try to change the shutter speed/ISO until the ‘calculated average’ is greater then the ‘reference point’ or the ‘Slowest shutter speed’ (7) or ‘Max ISO’ is reached.
When used with ‘sunrise’ option (3) if the ‘reference point’ is smaller then ‘calculated average’ the application will try to change the shutter speed/ISO until the ‘reference point’ is greater then ‘calculated average’ - Frame – this is the ‘current frame’/’correction frame count’ number
- Image display area – this is where the downloaded JPG image is downloaded.
Single click – will enabled/disable the full screen image view
Press and hold – the user can scroll the image
Mouse wheel/pinch zoom – zoom in/out the image
Using the ‘auto holy grail’
The user enters the LrTimelapse screen (prerequisites are that the camera is in M mode, the EV step and ISO EV step are same, the image format is set to any of the RAW+JPG format).
If not enabled the user enables the ‘display next JPG’ option and makes a capture with the camera capture button or the connected intervalometer capture button. After capture the application will download, display and analyze the JPG image. It will calculate the ‘average’ value from histogram and set the ‘reference point’ according the calculated ‘average’ value. The user selects the desired ‘auto holy grail’ direction (sunset, sunrise), selects the ‘slowest shutter speed’ and ‘Max ISO’ values. The user also selects the desired ‘average pool size’ value and the ‘correction frame count’ options.
If needed the user changes the ‘reference point’ value with the -/+ buttons.
After all the options are set the users enables the ‘auto holy grail’ by pressing on the ‘auto holy grail’ button and finally the users starts the intervalometer.