added a wakelock to Android when LRTimelapse is started (now it should work even if the screen goes off)
added focus points definition (works with Nikon and Canon – will see to make a tutorial)
changed the ‘Image viewer’ loading notification
added an option to disable image info download for images that are already on the camera SD card (you can still load them by pressing the ‘Refresh’ button in image gallery)
added a generic PTP class that should work with non Nikon and Canon DSLR that support PTP (I can’t test this as I only have a Nikon and Canon)
The V0.2.1 is almost a complete rewrite of the V0.1.7. Mostly I needed to do this so I can add Sony support (probably Lumix also in future) but also needed to rewrite the UI handling
New in this version
Audio initiated capture (will see to make a video how to use it)
Sony support (for now very basic)
Improved or changed:
image review will prioritize JPG files (in an upcoming version I will add an option that can override this and prioritize RAW files
if qDD enters the image viewer for an image review it will stay there until the user exits it and it will display the upcoming captured images (captured with the camera capture button)
gallery is now dynamically created and only the visible items are displayed/loaded
thumbs are created in a separate thread and only when needed (as soon the user exits the gallery all the scheduled thumbs are removed from queue)
added option to delete the created thumbs upon application exit
the is a live view record option that will record the live view during movie recording (currently does not work on Android)
UI is now dynamically loaded so should use less memory
The A/B focus is not yet implemented as need to rewrite it
This is a new version (V0.2) that I was doing in parallel to the V0.1.x and I rewrote most of it. New in this version is the Sony wireless support and the audio initiated capture.
The Sony support for now is very basic, live view, capture and changing the exposure properties. I will try to implement more in future versions (LrTimelapse module, more properties, movie recording on devices that support it)
Note: I’m sorry that I couldn’t offer it as free but currently I’m unemployed and need some income to pay my bills.
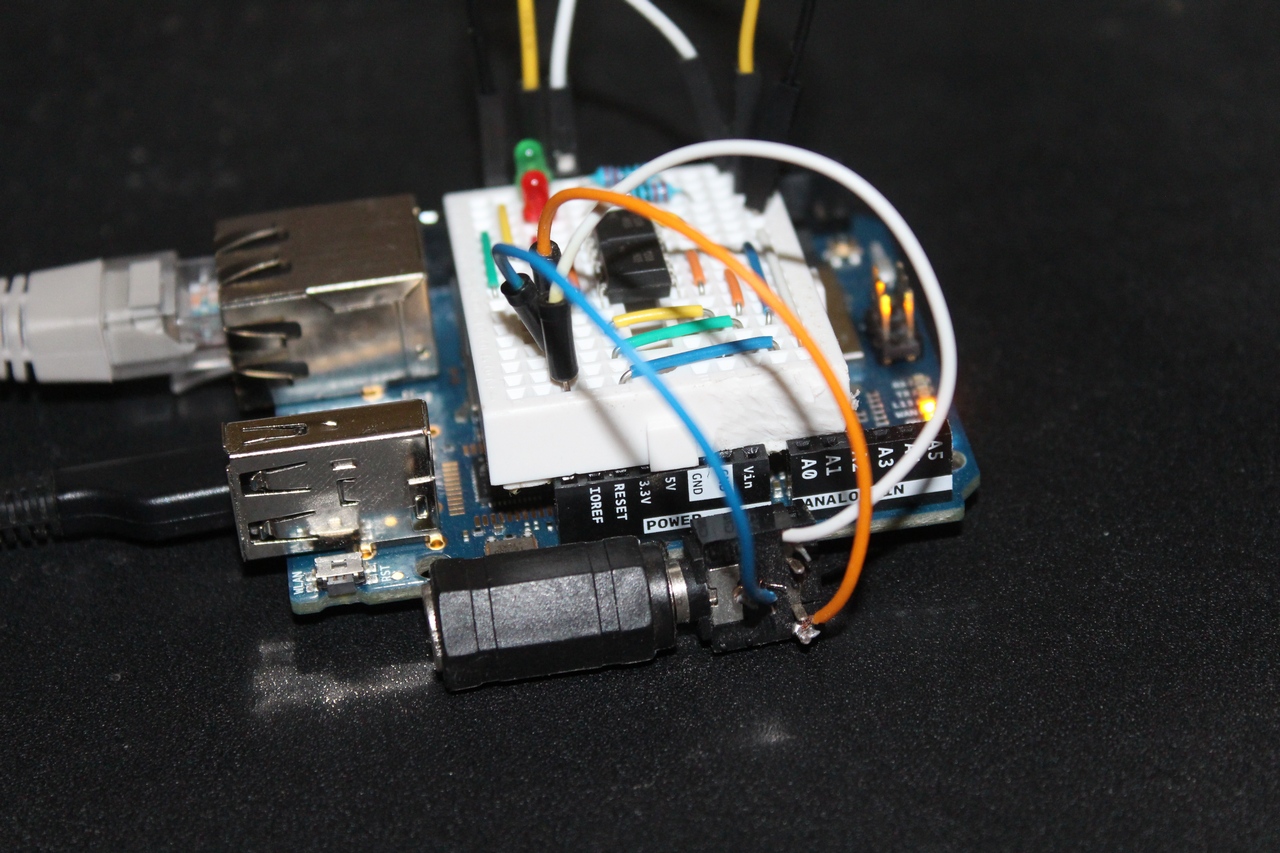
I have an Arduino Yun here and I like it. It is actually 2 devices in one, a wireless router running OpenWrt and Arduino Leonardo. You can read more about it on the Arduino Yun page.
I already installed ddserver on the Yun and use it during my qDD development.
Now I built a small external Interval Timer with the Arduino Yun that can be controlled over web (http) and also added a dialog into qDD so that I can control it from there. The timer has a 2.5 mm stereo audio jack where I can connect my camera (tested with D7100, D5000 and 650D)
Right now it is not much of use for ordinary users as you need a Yun, a small hardware board and an sketch that controls it but if anyone interested please contact me.
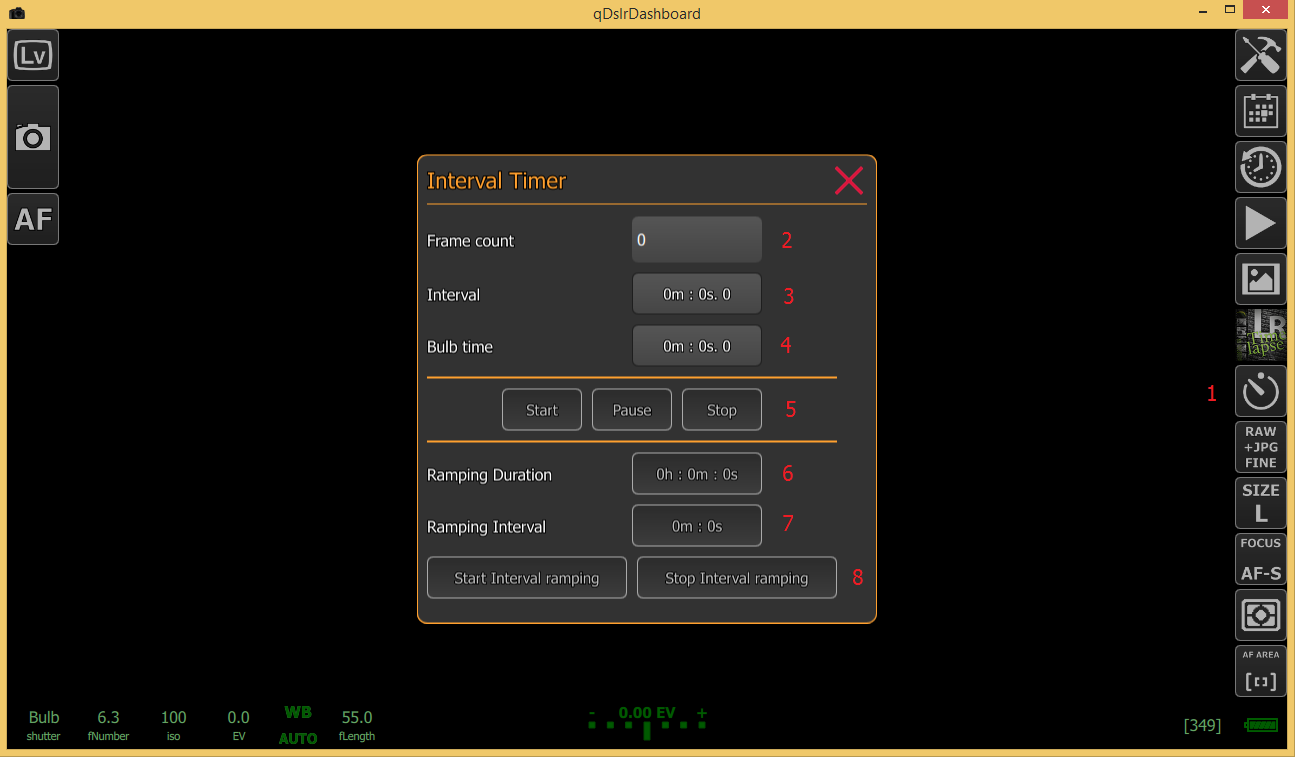
Here a short description of the Arduino Yun Interval Timer dialog:
Yun Interval Timer button – long press the Interval Timer button to show the Yun Interval Timer dialog
Yun address – in this filed the user should enter the Yun address. This depends on your Yun settings and how you use. In my case it is connected to my local network and I assigned a host name to it (arduinoyun). By default the Yun is password protected (default password is arduino) so in my case the address would be http://root:arduino@arduinoyun . After the address is entered the users should press the ‘Connect’ button so that qDD can query the Yun Interval Timer status. If qDD gets a positive response from the Yun it will enable the Yun Interval Timer controls
Frame count – the desired frame count. If leaved at 0 the Yun Interval Timer will run until it is stoped with the ‘Stop’ button
Interval – the desired Interval that the Yun should use. The minimal Interval is 1 second.
Bulb time – the time Yun will hold the capture button pressed. Only has effect if the camera Shutter Speed is set to BULB. If not used this value should be 0
Focus hold – Yun will use this time to hold the camera capture button in ‘half pressed’ status used for focusing. By default the value is 40ms (mili seconds). This time can be used if camera is set to MF (manual focus). If you need auto focus before capture this should be increased
Shutter hold – Yun will use this time to hold the camera capture button in ‘full pressed’ status. By default the value is 20 ms (mili seconds). If BULB time is set then Yun will use that value instead of this one.
Timer controls – with these buttons the user can control the Yun Interval Timer. It can start/stop/pause/resume the Timer
Interval ramping duration – the duration of the Interval Ramping.
During this time Yun will gradually increace/decrease the Interval to the Target Interval
At the end of the ramping Yun will set the Target Interval as the current interval.
Target interval – the Target Interval that will be used for the Interval Ramping.
Interval Ramping control – with these buttons the user can start/stop the Yun Interval Ramping. If the ramping is stoped Yun will set the current interval to the last interval.
Interval timer button – with this button you can show/hide the Interval Timer dialog (if the Timer is active the button will be red colored)
Frame count – the desired frame count. If the frame count value is 0 the Timer will run until the user stops it
Interval – the desired interval (minimum interval is 1 second)
Bulb time – the desired bulb time if shutter speed is set to BULB. This field is only visible if shutter speed is set to BULB. NOTE: the BULB Timer will only work on DSLR that support BULB capture
Timer controls – with these buttons you can start/stop/pause/resume the Interval Timer NOTE: if the settings are wrong the Timer will not start (BULB time > interval)
Interval ramping duration – the duration of the interval ramping. The timer will increase/decrease the current interval to the target interval. For now only linear inc/dec is added. NOTE: at the end of the interval ramping the application will set the target interval as the current interval
Interval ramping target interval – the target interval for the interval ramping. The application will gradually increase/decrease the current interval during the interval ramping duration until it reaches the target interval
Interval ramping control – with these buttons you can start/stop the interval ramping function. NOTE: if you stop the interval ramping the application will set the last interval as the current interval
Was doing some testing with qDD and LrTimelapse and here is what came out.
I used the Nikon D7100 with 18-55mm objective and the Canon 650D with 18-55mm objective. Unfortunately I only have 1 battery for each so I needed to change the cameras in the middle of blooming. A cheap Chinese external intervalometer was used with both cameras. For tripod I used the Velbon VS-443D. And of course my Wife’s cactus was used. 🙂
The sequence was capture from 17:30 till 23:00. Next morning it alreadz withered. 🙁
For first part (D7100) qDD was running on my Windows 7 notebook, for second part (650D) qDD was running on Nexus7 (2012).
Slowest shutter speed was set to 15″ and max.ISO to 3200 (but gone only to 1600). Interval was set to 18″. In the second part I made a mistake and closed my notebook that was in the room behind .